Working with Checks in QuickBooks
Online banking may get all the headlines, but a lot of small businesses still prefer paper checks. QuickBooks can accommodate them.
“I don’t write checks anymore,” you hear a lot of people say these days. Debit cards, smartphone payment apps, and online banking have replaced the old paper checkbook for a lot of consumers.
That’s fine if you’re at Starbucks or the grocery store, but many small businesses still prefer to issue paper checks to pay bills, cover expenses, and make product and service purchases. QuickBooks provides tools that help you create, print, and track checks.
But you don’t just head to the Write Checks window every time something needs to be paid. There are numerous times when you would record a payment in a different area of the program. For example, if you’ve already created a bill in Enter Bills, you’d go to the Pay Bills screen to dispatch a check.
 Once you’ve recorded a bill in Enter Bills, you need to visit the Pay Bills screen to dispatch a check. The image above shows the bottom of that screen.
Other examples here include:
- Issuing paychecks (click the Pay Employees icon),
- Submitting payroll taxes and liabilities (Pay Liabilities icon), and
- Paying sales taxes (Manage sales tax icon).
Simple Steps
Let’s say you asked an employee to go to an office supply store to pick up some copy paper because you ran short before your normal shipment came in. If you knew the exact amount it would cost, you could write a check directly to the shop. But the employee agrees to pay for it and be reimbursed.
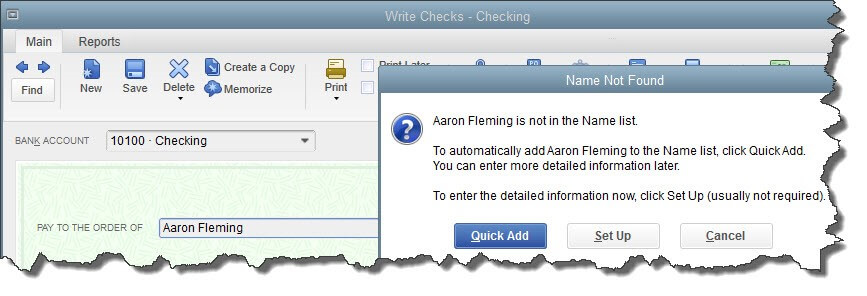
Click the Write Checks icon on the home page. If the BANK ACCOUNT that’s showing isn’t the correct one, click the arrow to the right of that field and select the right one. Unless you’ve written a check to that employee before, he won’t be in the Vendor list that opens when you click the arrow to the right of PAY TO THE ORDER OF. Enter his name in that field.
The Name Not Found window opens. If this was a new vendor that you would be working with again, you’d click Set Up and follow the instructions in the step-by-step wizard that opened. Since this isn’t the case, click Quick Add. In the window that opens, click the button next to Vendor.
Note: If you’re using a payroll application, you already have an employee record for that individual, which would have filled in automatically when you started typing the name. Since this is a Non-Payroll Transaction, it won’t get mixed up with his payroll records as long as you assign the correct account.

If you don’t want to create an entire record for the payee of a check, you can just click Quick Add.
QuickBooks will then return you to the check-writing screen, where you can verify the check number and date, and enter the amount. Fill in the MEMO field so you’ll remember the reason for the payment.
At the bottom of the screen, you’ll see a tabbed register. The Expenses tab should be highlighted and the amount of your check entered. Click the down arrow in the field under ACCOUNT to open the list, and select Office Supplies. The AMOUNT should fill in automatically. Not sure which account to select, and what the remaining three columns mean? Ask us.
Note: You would only enter the expense under the Items tab if you were buying inventory items or paying job-related costs.
 Warning: If you’re planning to print the check, be sure to check the Print Later box in the horizontal toolbar at the top of the screen.
When you’re finished, save the transaction. Since you want to pay the employee right away, click the Print Checks icon and click in the field in front of the correct check to select it, then click OK.
Easy, But Tricky
QuickBooks makes the mechanics of writing checks easy. Simple as it is, though, a lot can go wrong if you, for example:
- Issue a check from the wrong screen,
- Classify a check incorrectly, or,
- Skip a step.
We encourage you to set up a learning session with us if you’re new to check-writing in QuickBooks or are confused about any of its attributes. We’ll be happy to help ensure that your accounts payable activities will result in accurate record keeping.
For more information about our QuickBooks services and how we can help, please complete the form below or call us today!
